Got Blueberries? Jalapeños? Make Jam!!

I was wondering what to do with about fifteen jalapeños from our veggie garden.  I had already infused tequila, made countless jalapeño margaritas and eaten my fair share of jalapeño black beans.  I made jalapeño jam last year, but wanted to do something different.  While I was scouring the internet for ideas and came upon a posting for habanero blueberry jam.  Why not do jalapeños instead?   Switching up some of the other components in the rest of the recipe, I took a little gamble and I must say, it paid off!  I’m in love with this recipe and will definitely make it next year.

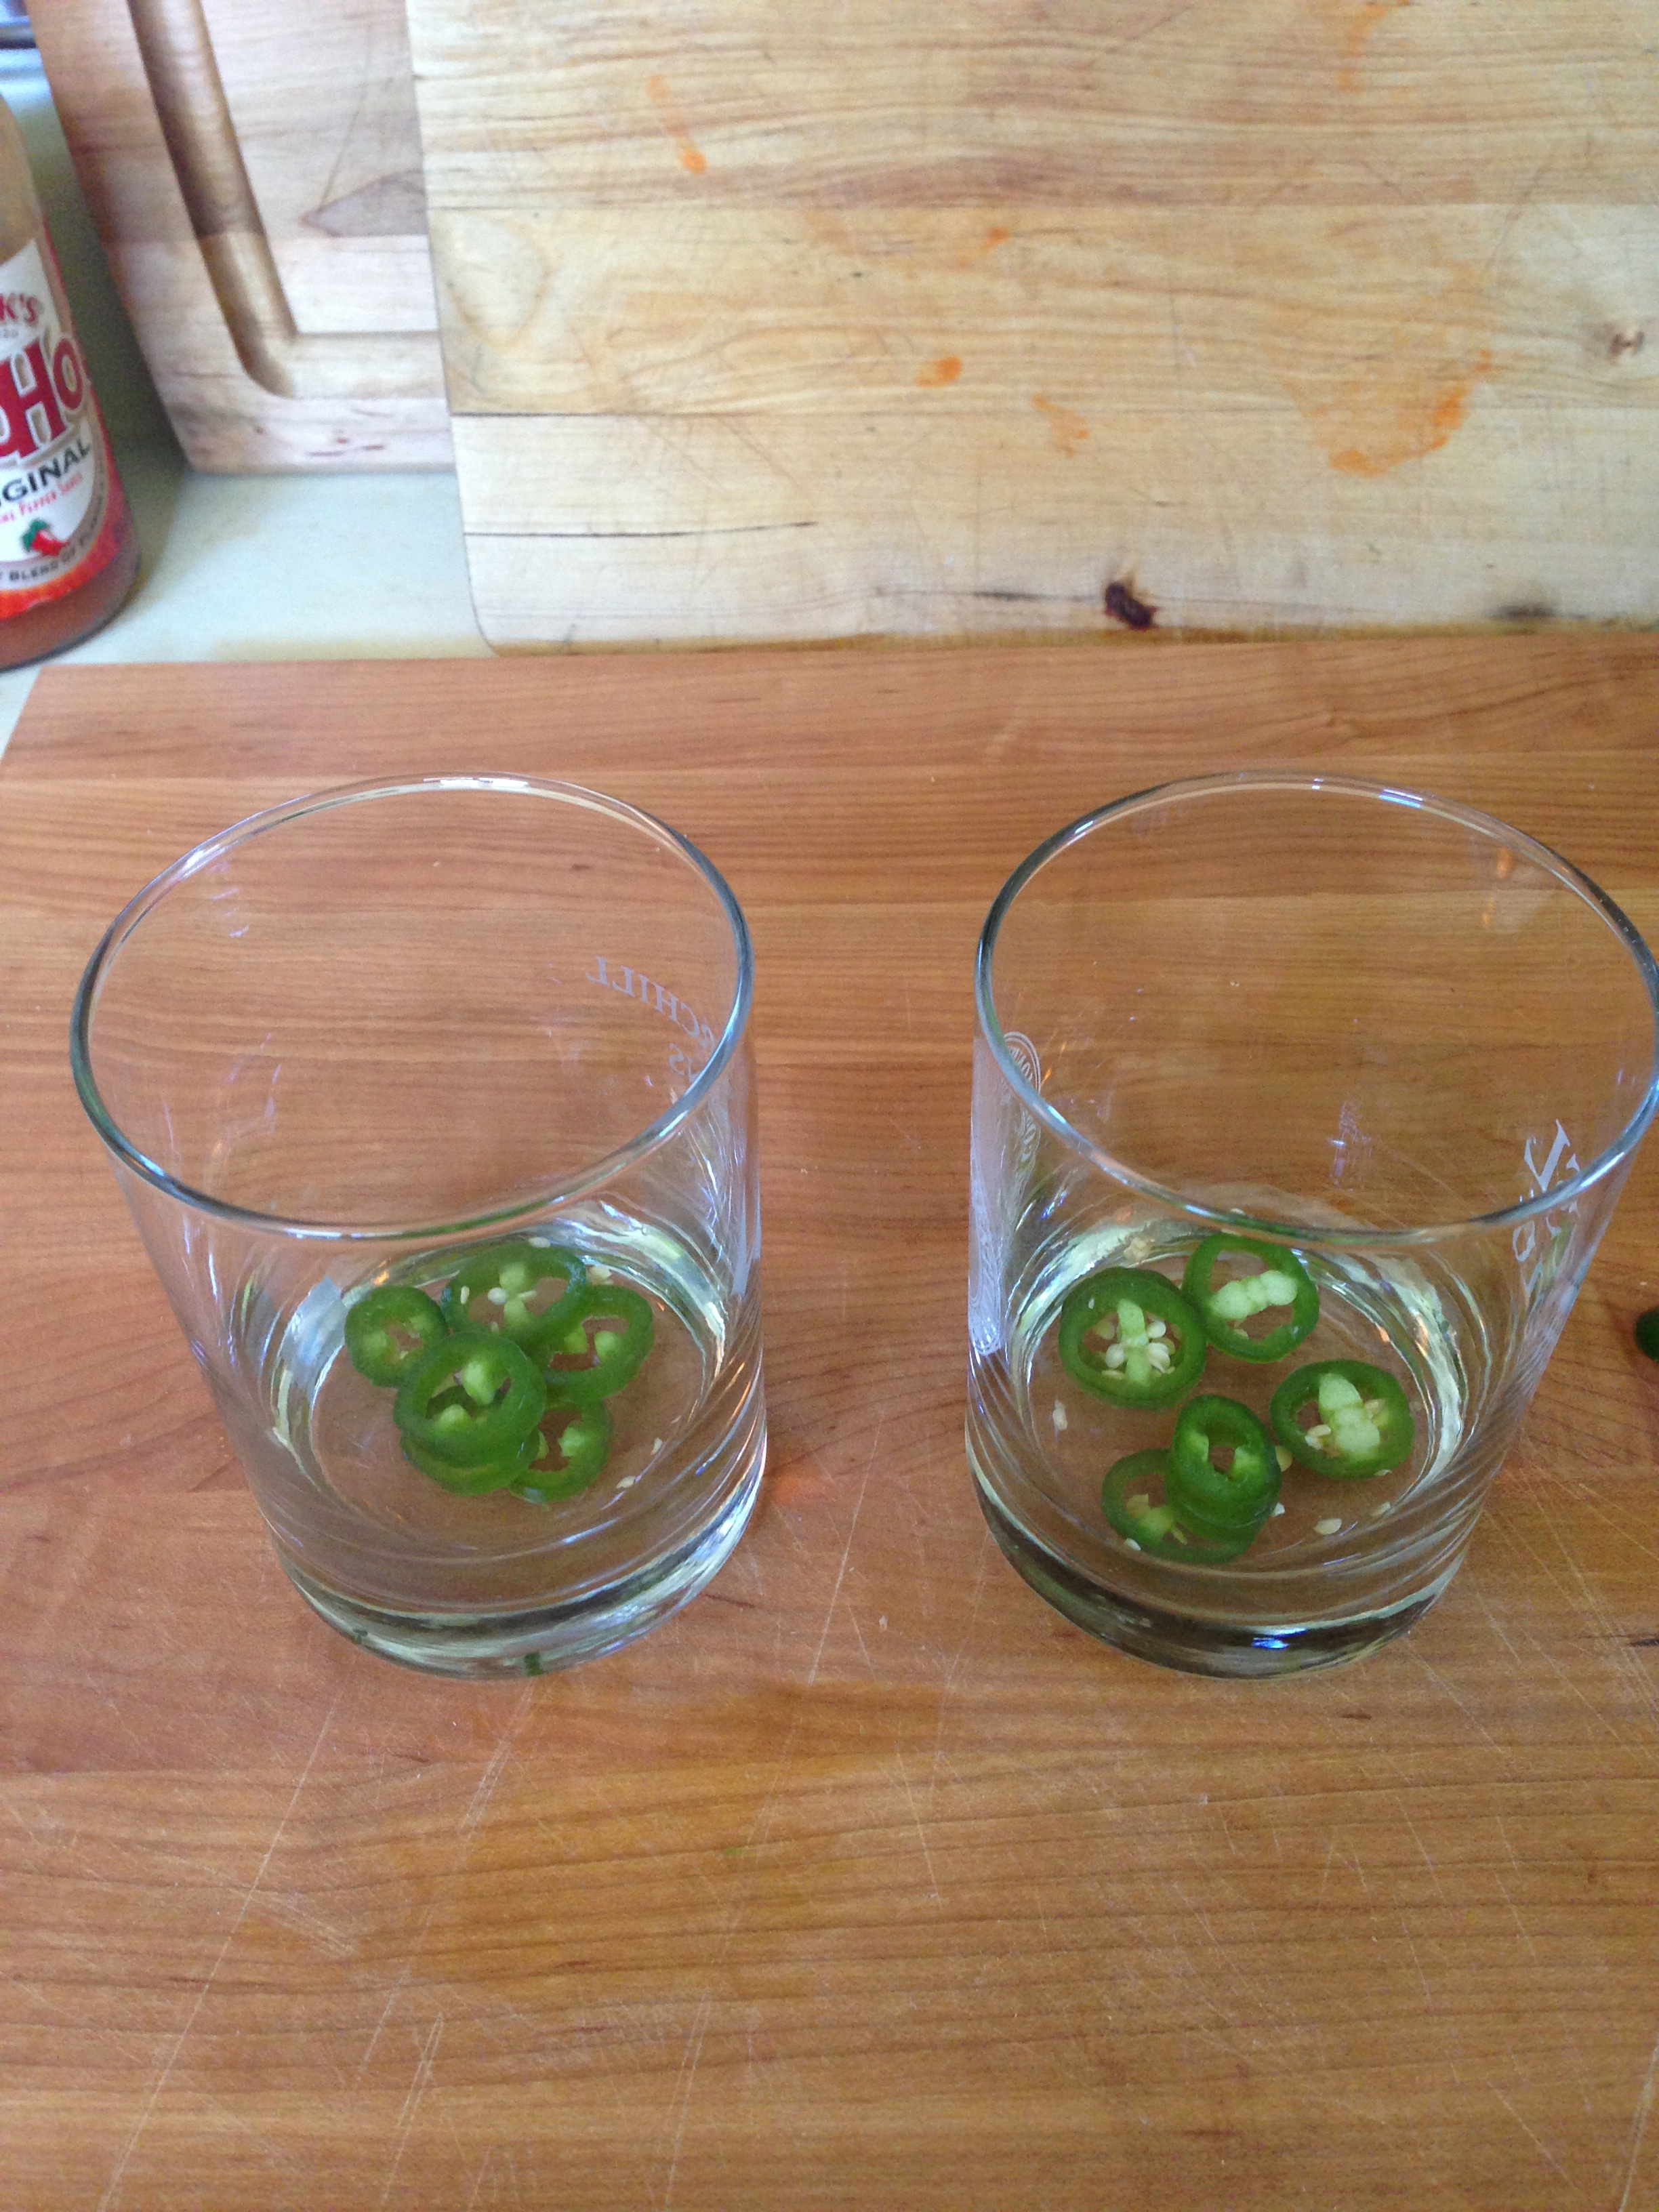
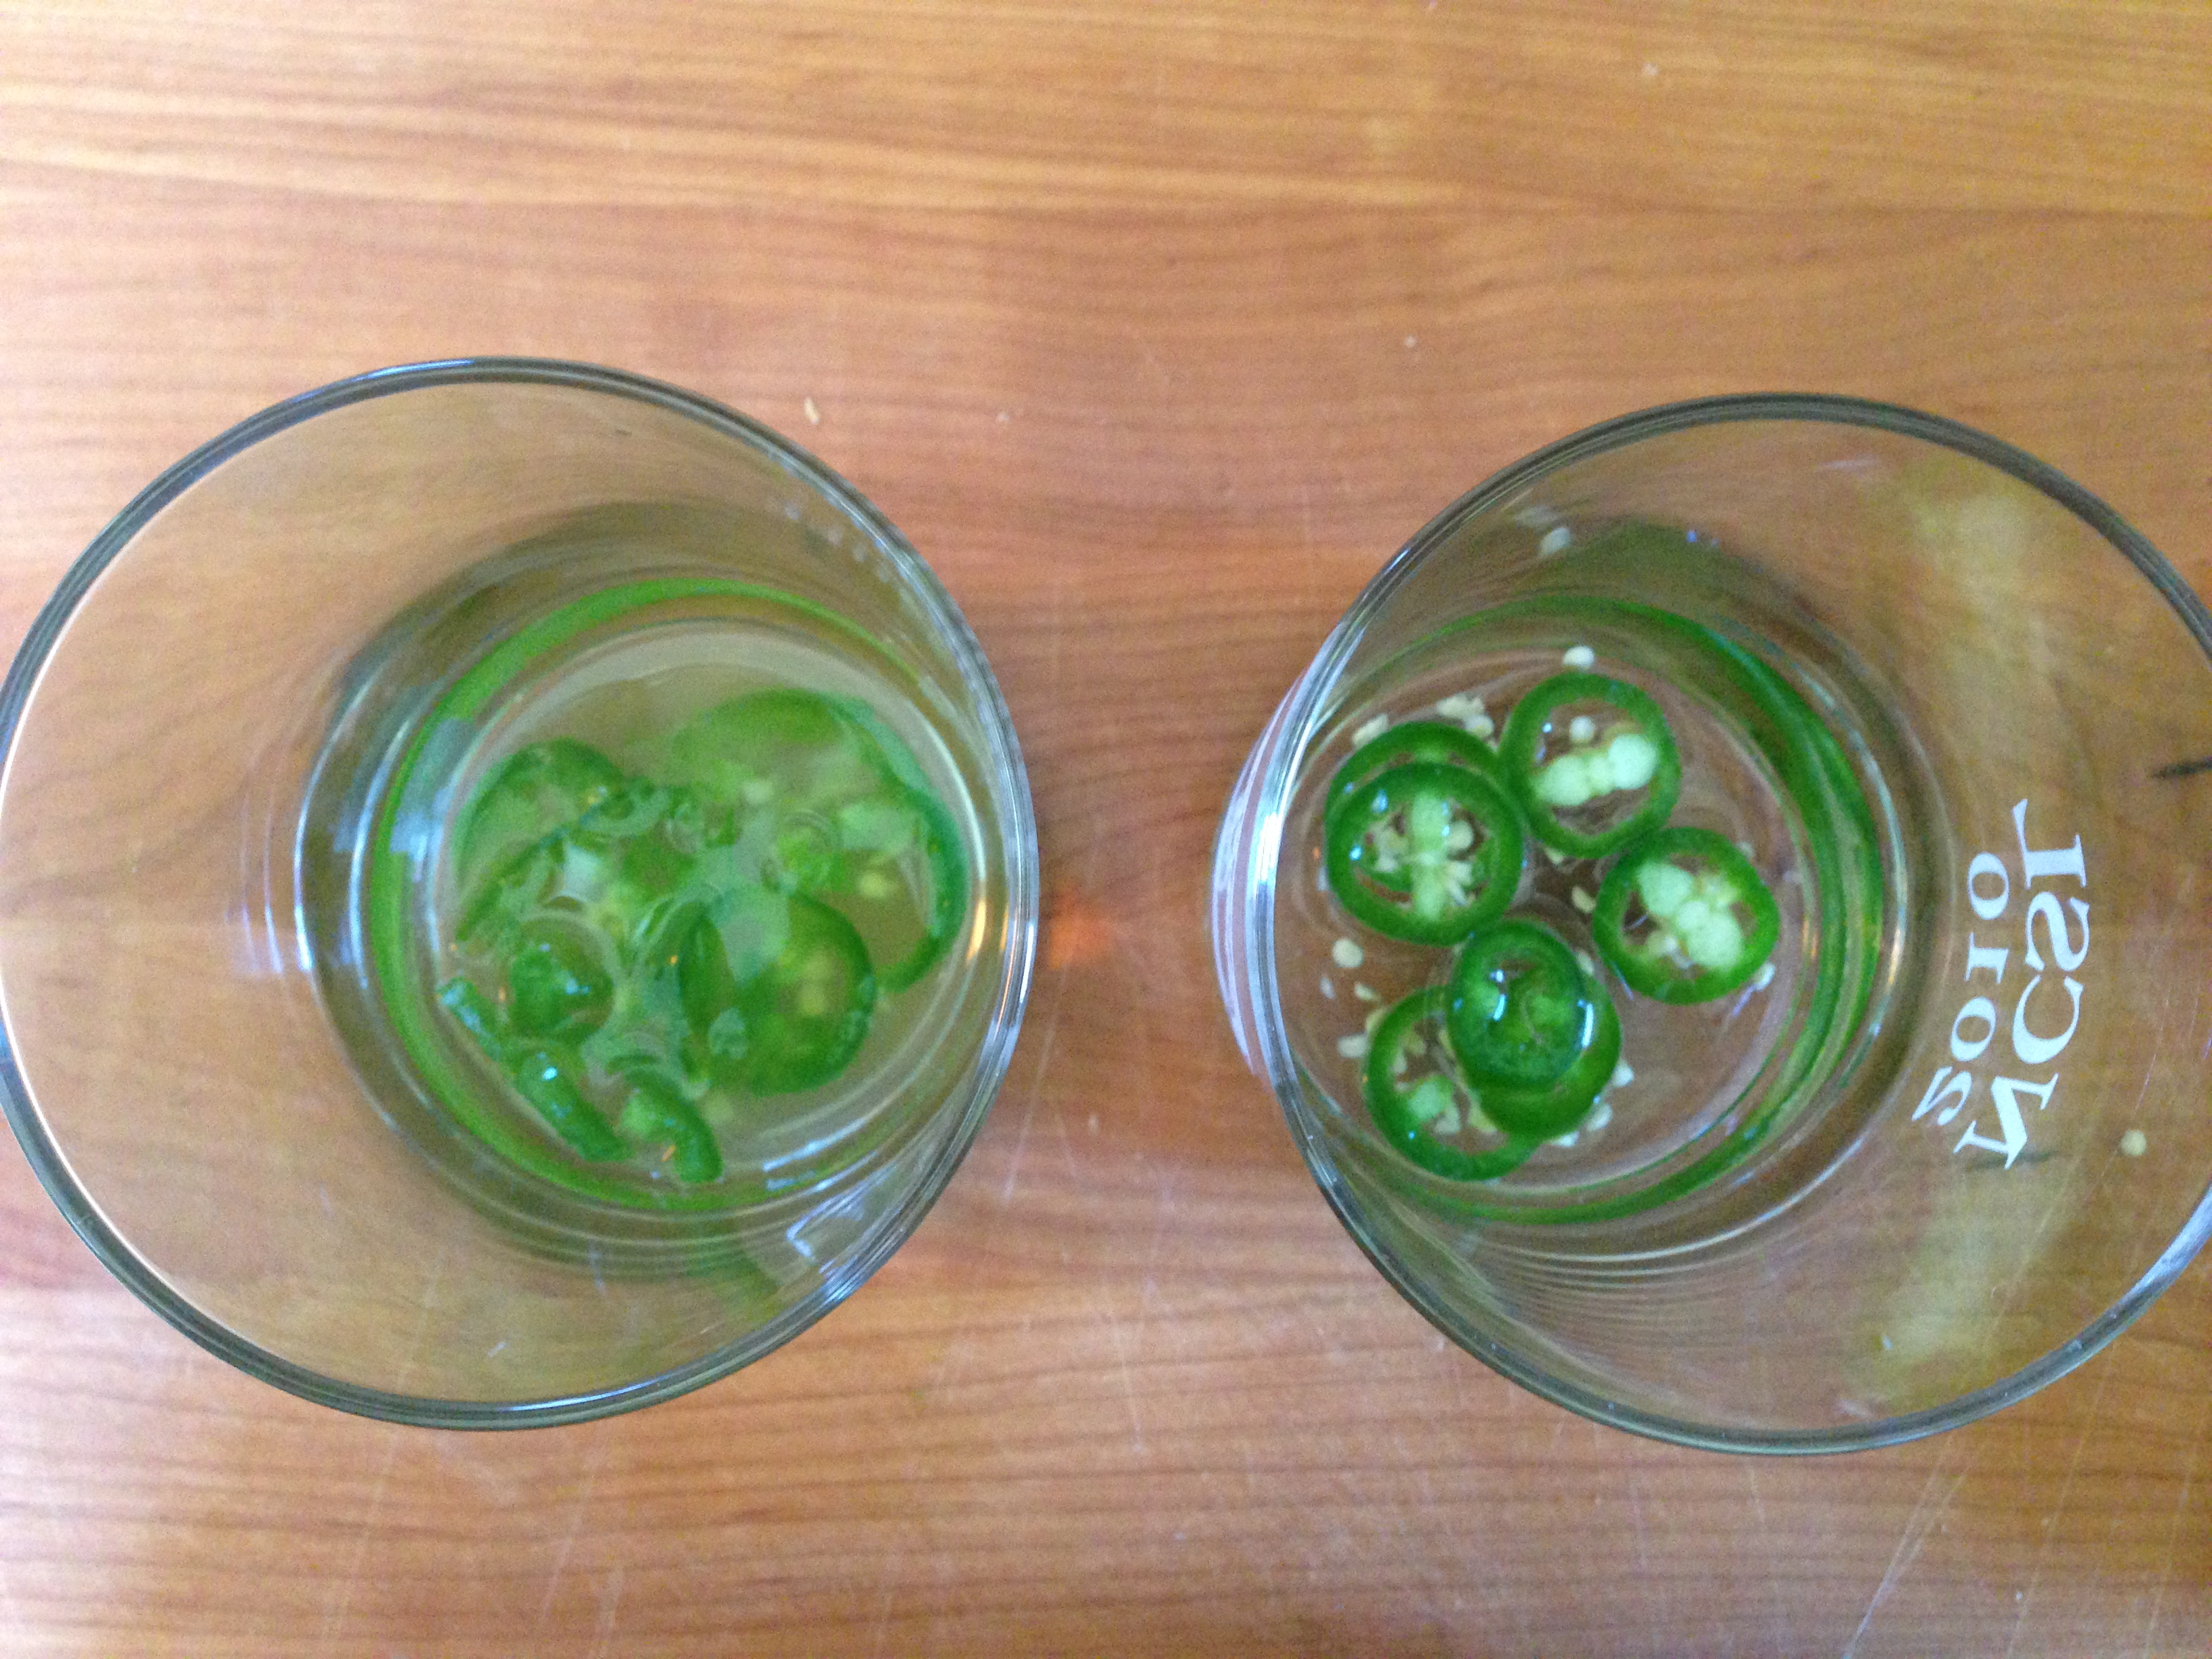
Starting out with two different mixtures one with the blueberries (blueberries, lemon juice and water) and one with the jalapeños (jalapeños, lemon juice, water and vinegar).  Boil both mixtures for 20 minutes on a medium high heat.

IMG_9561

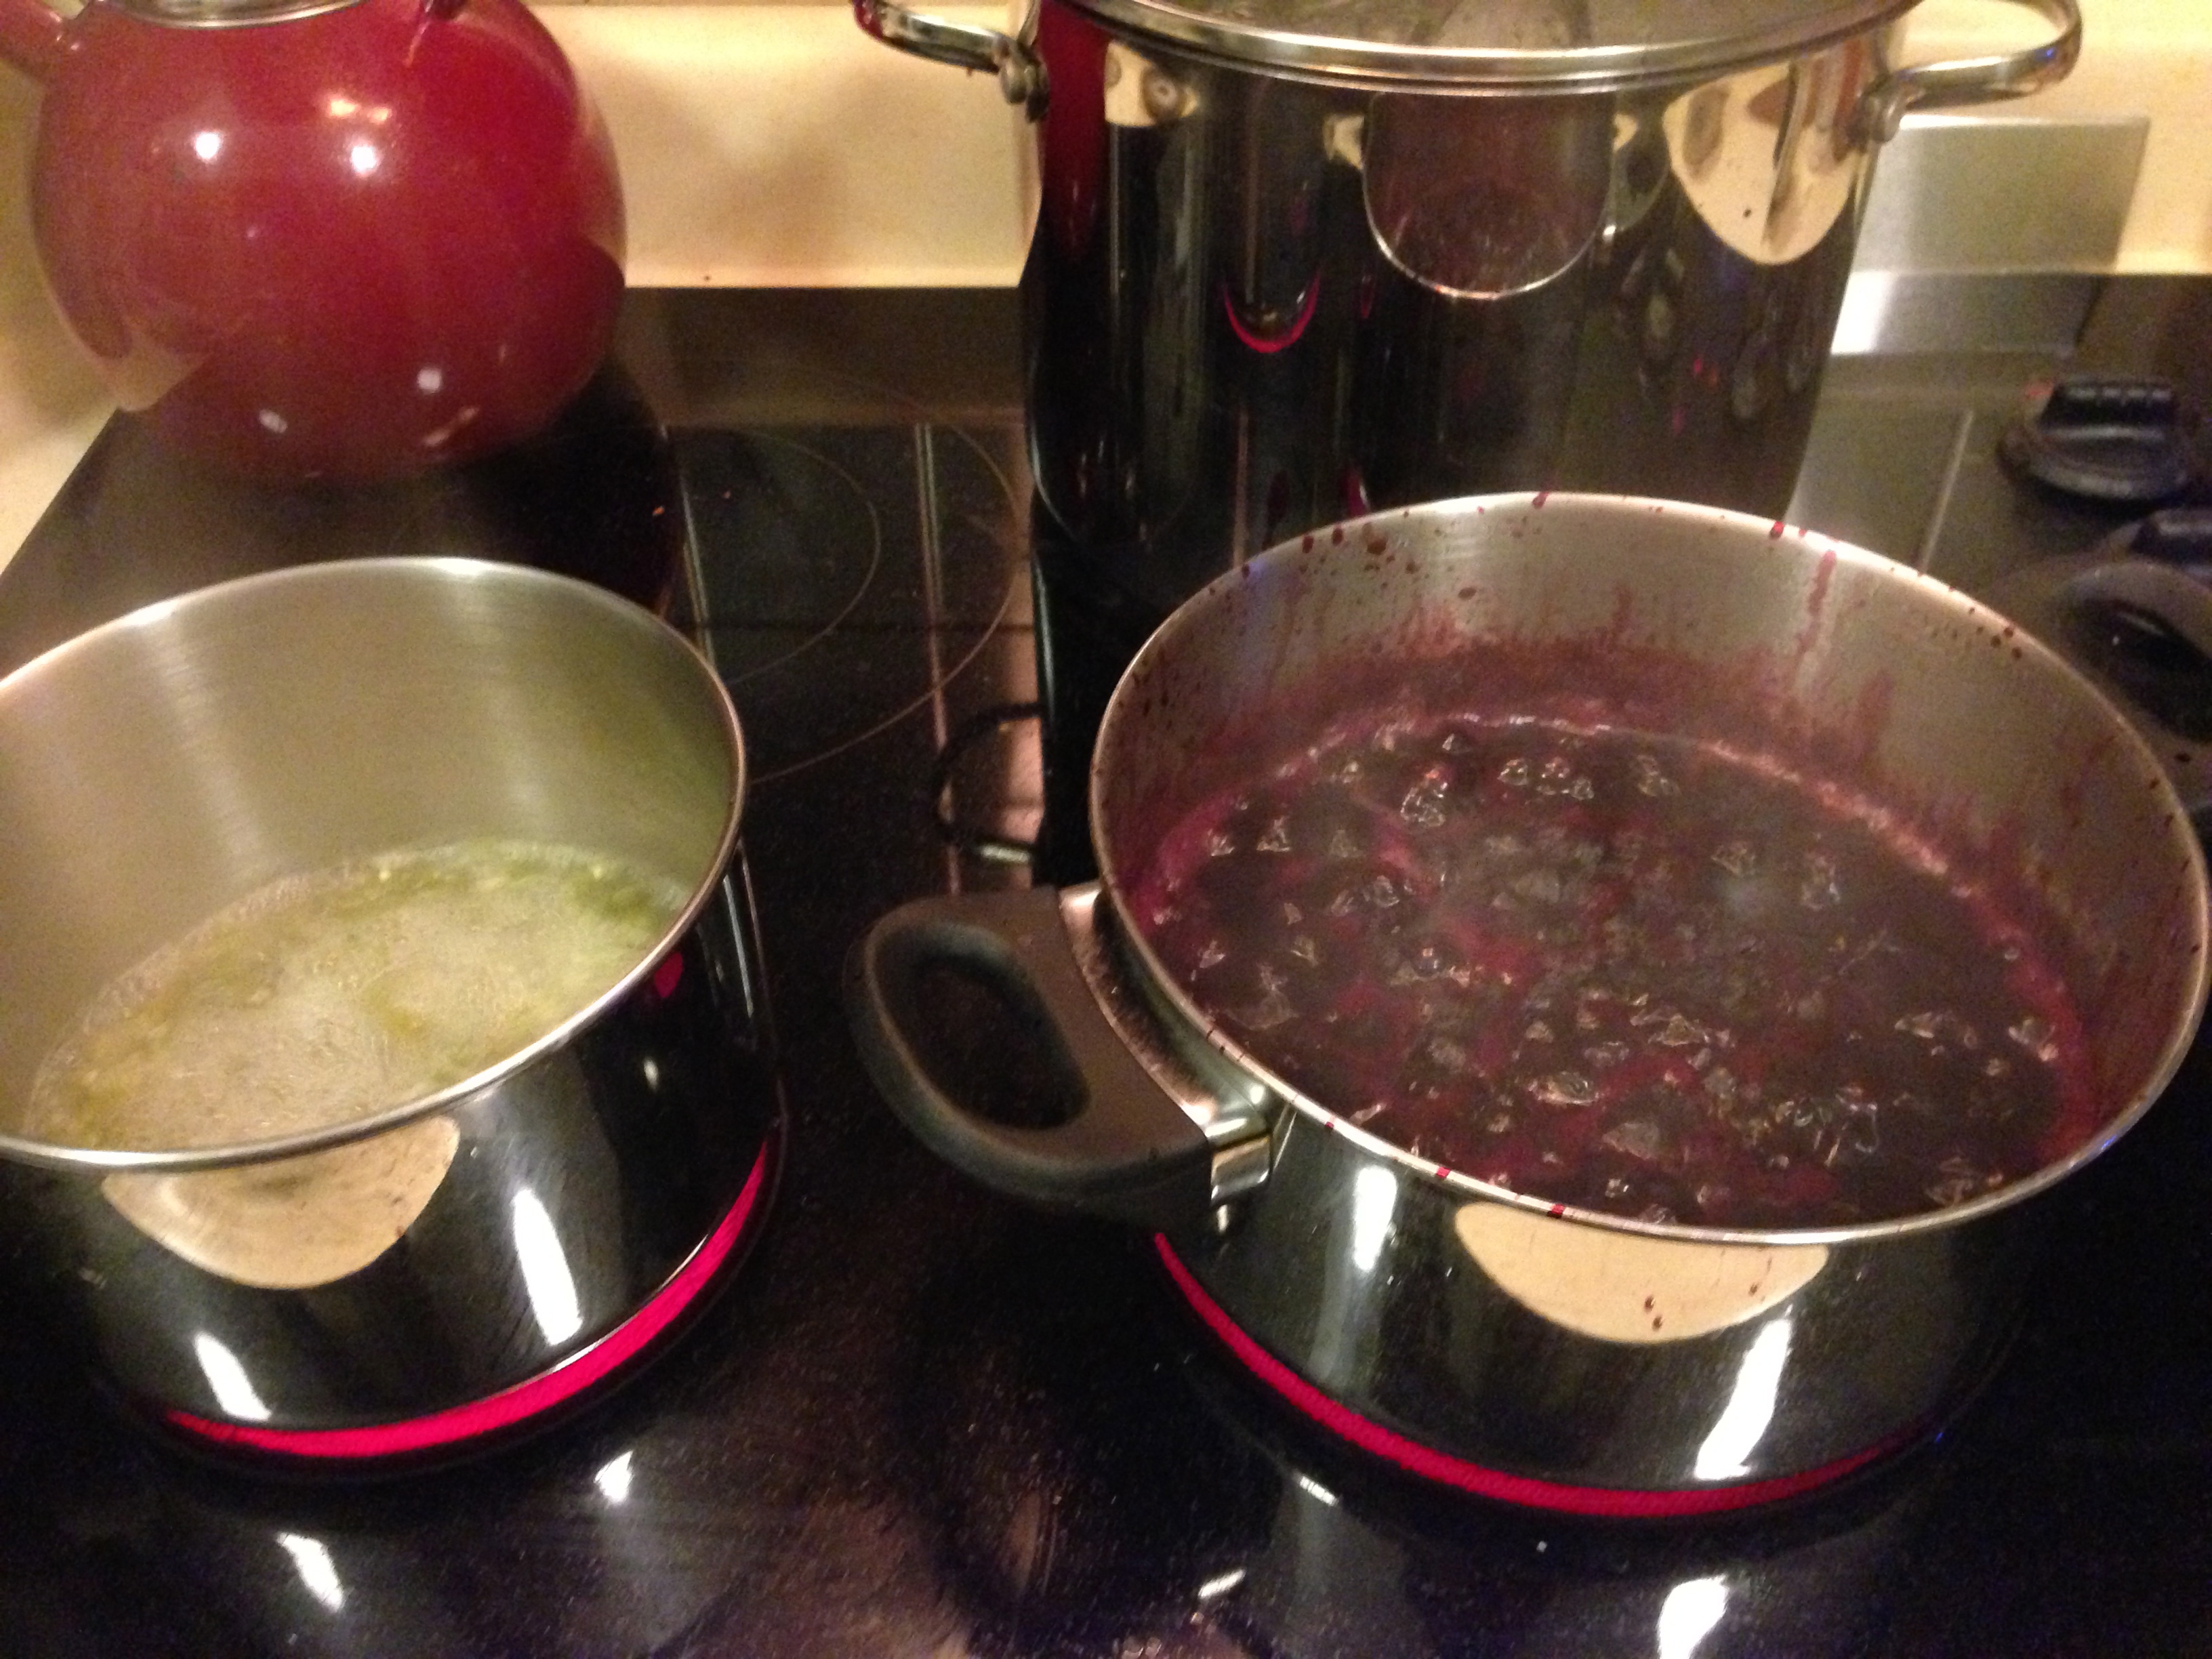
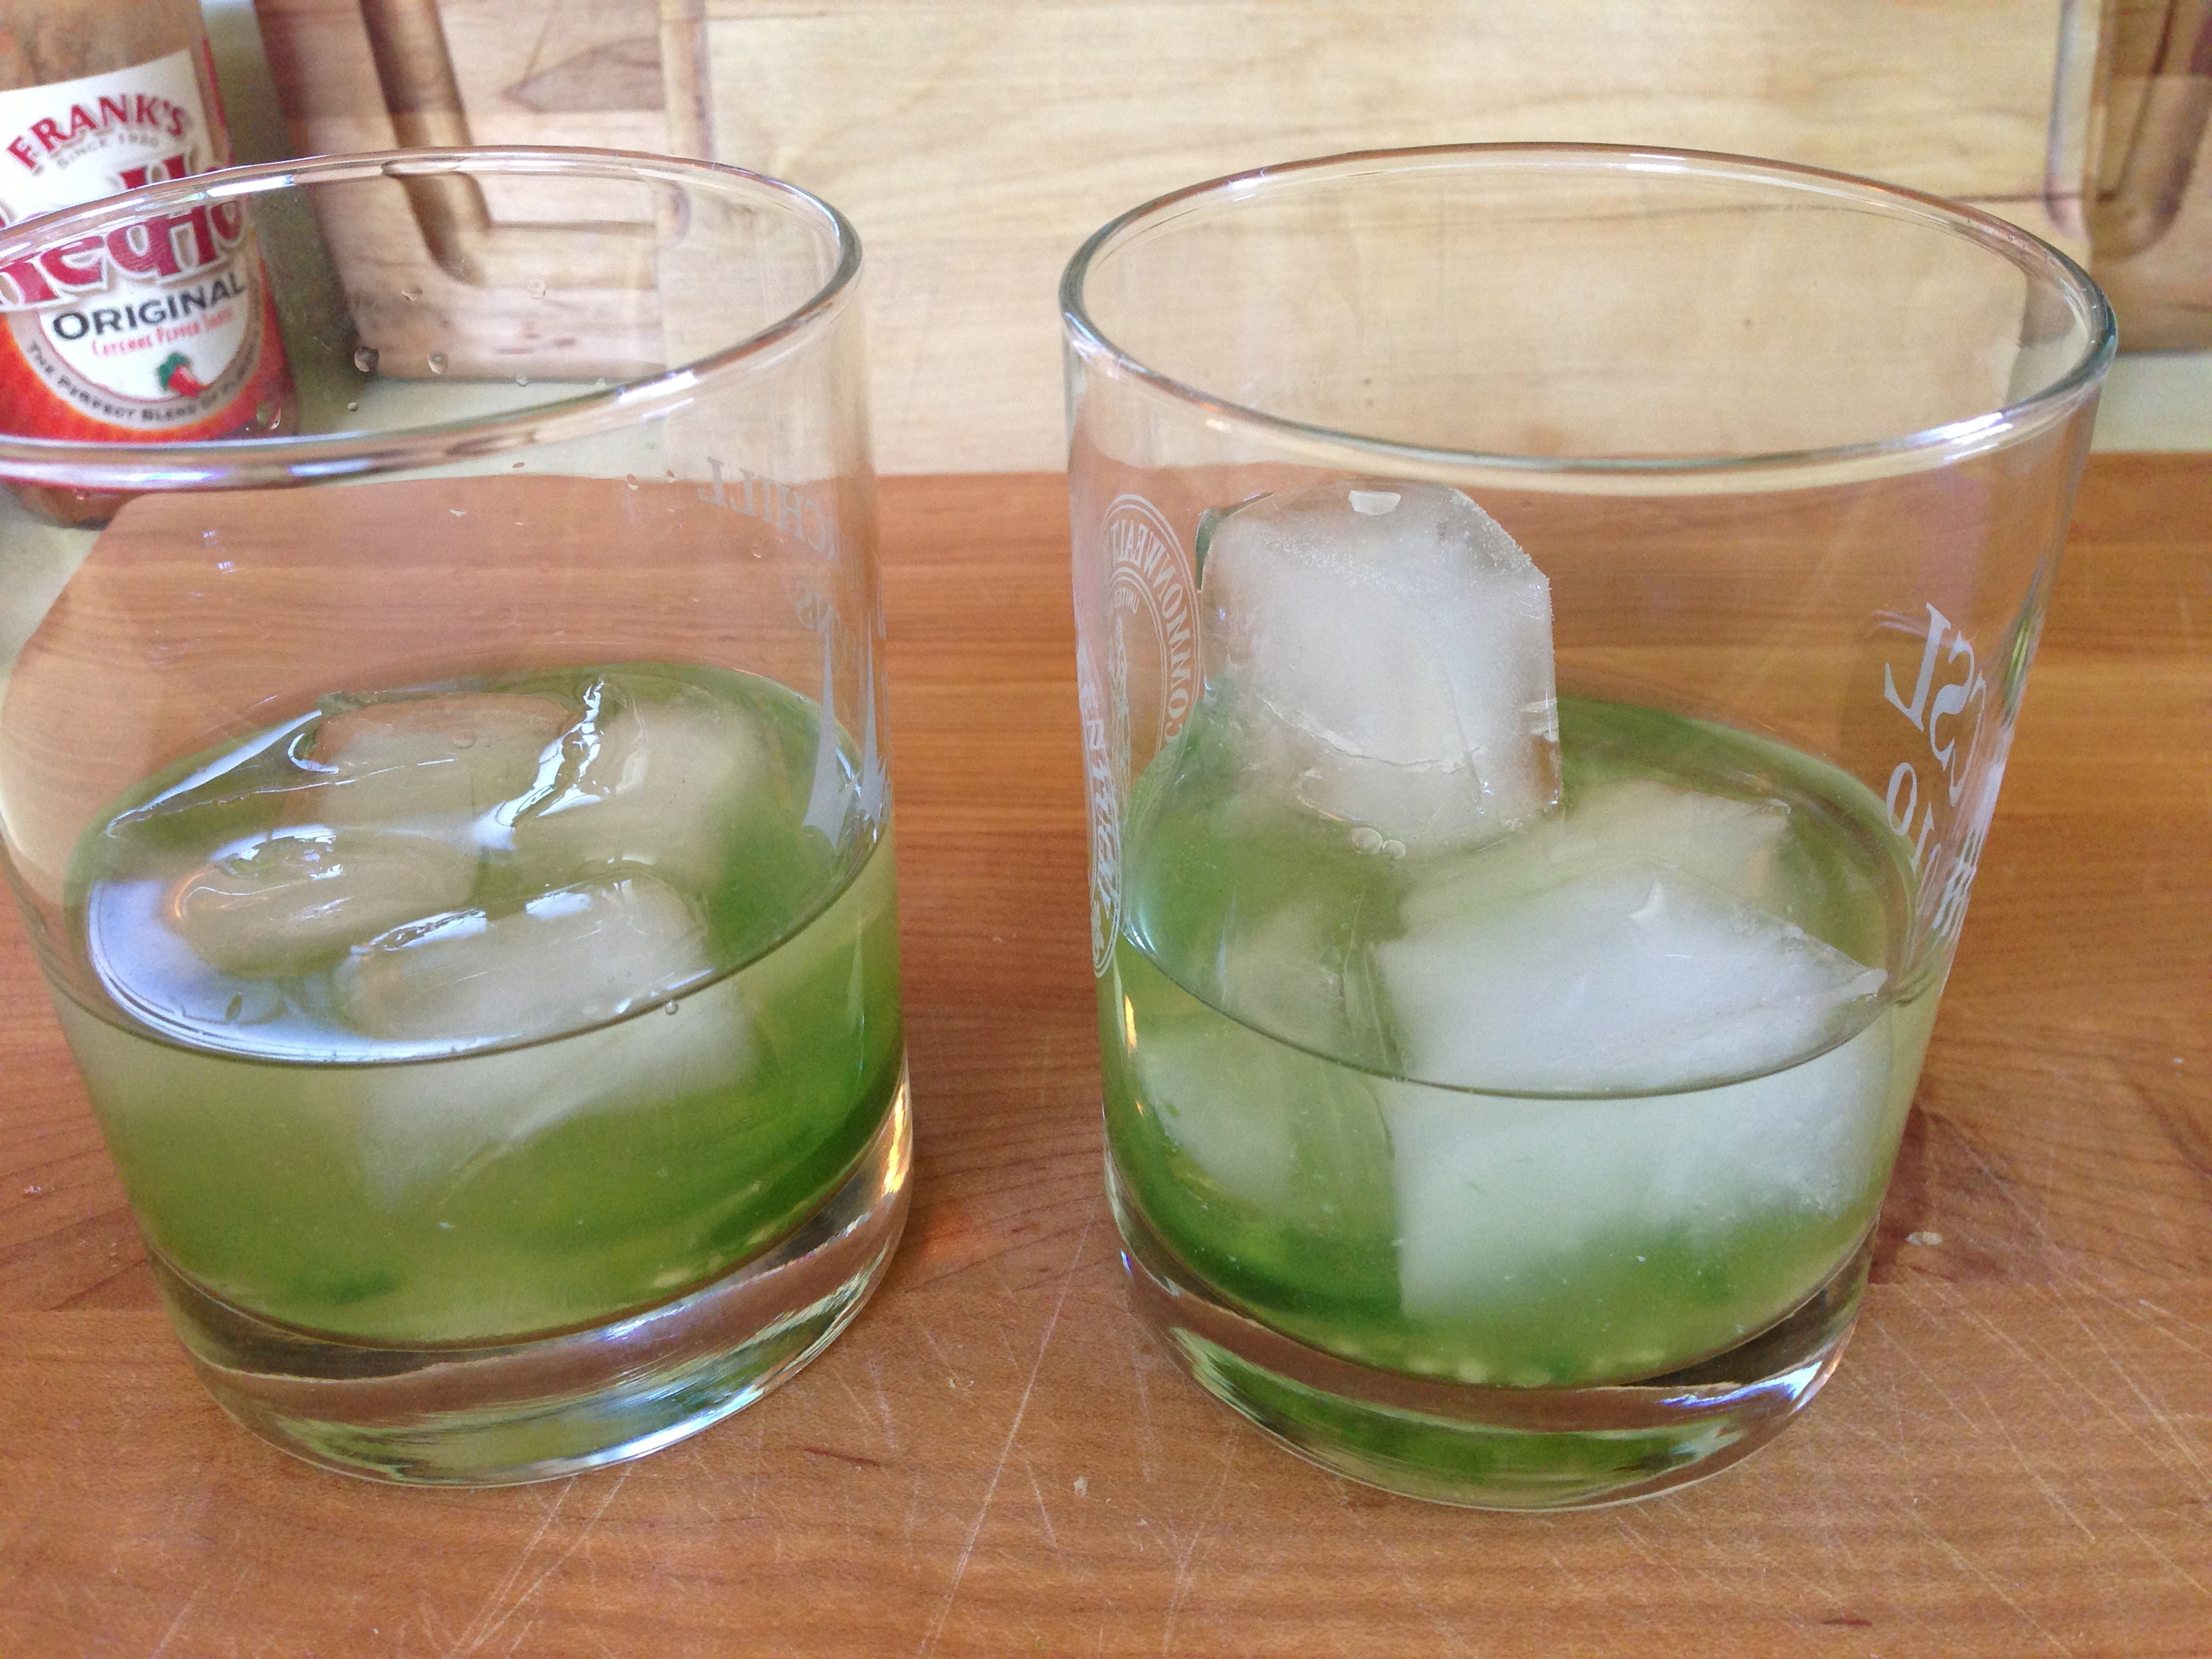
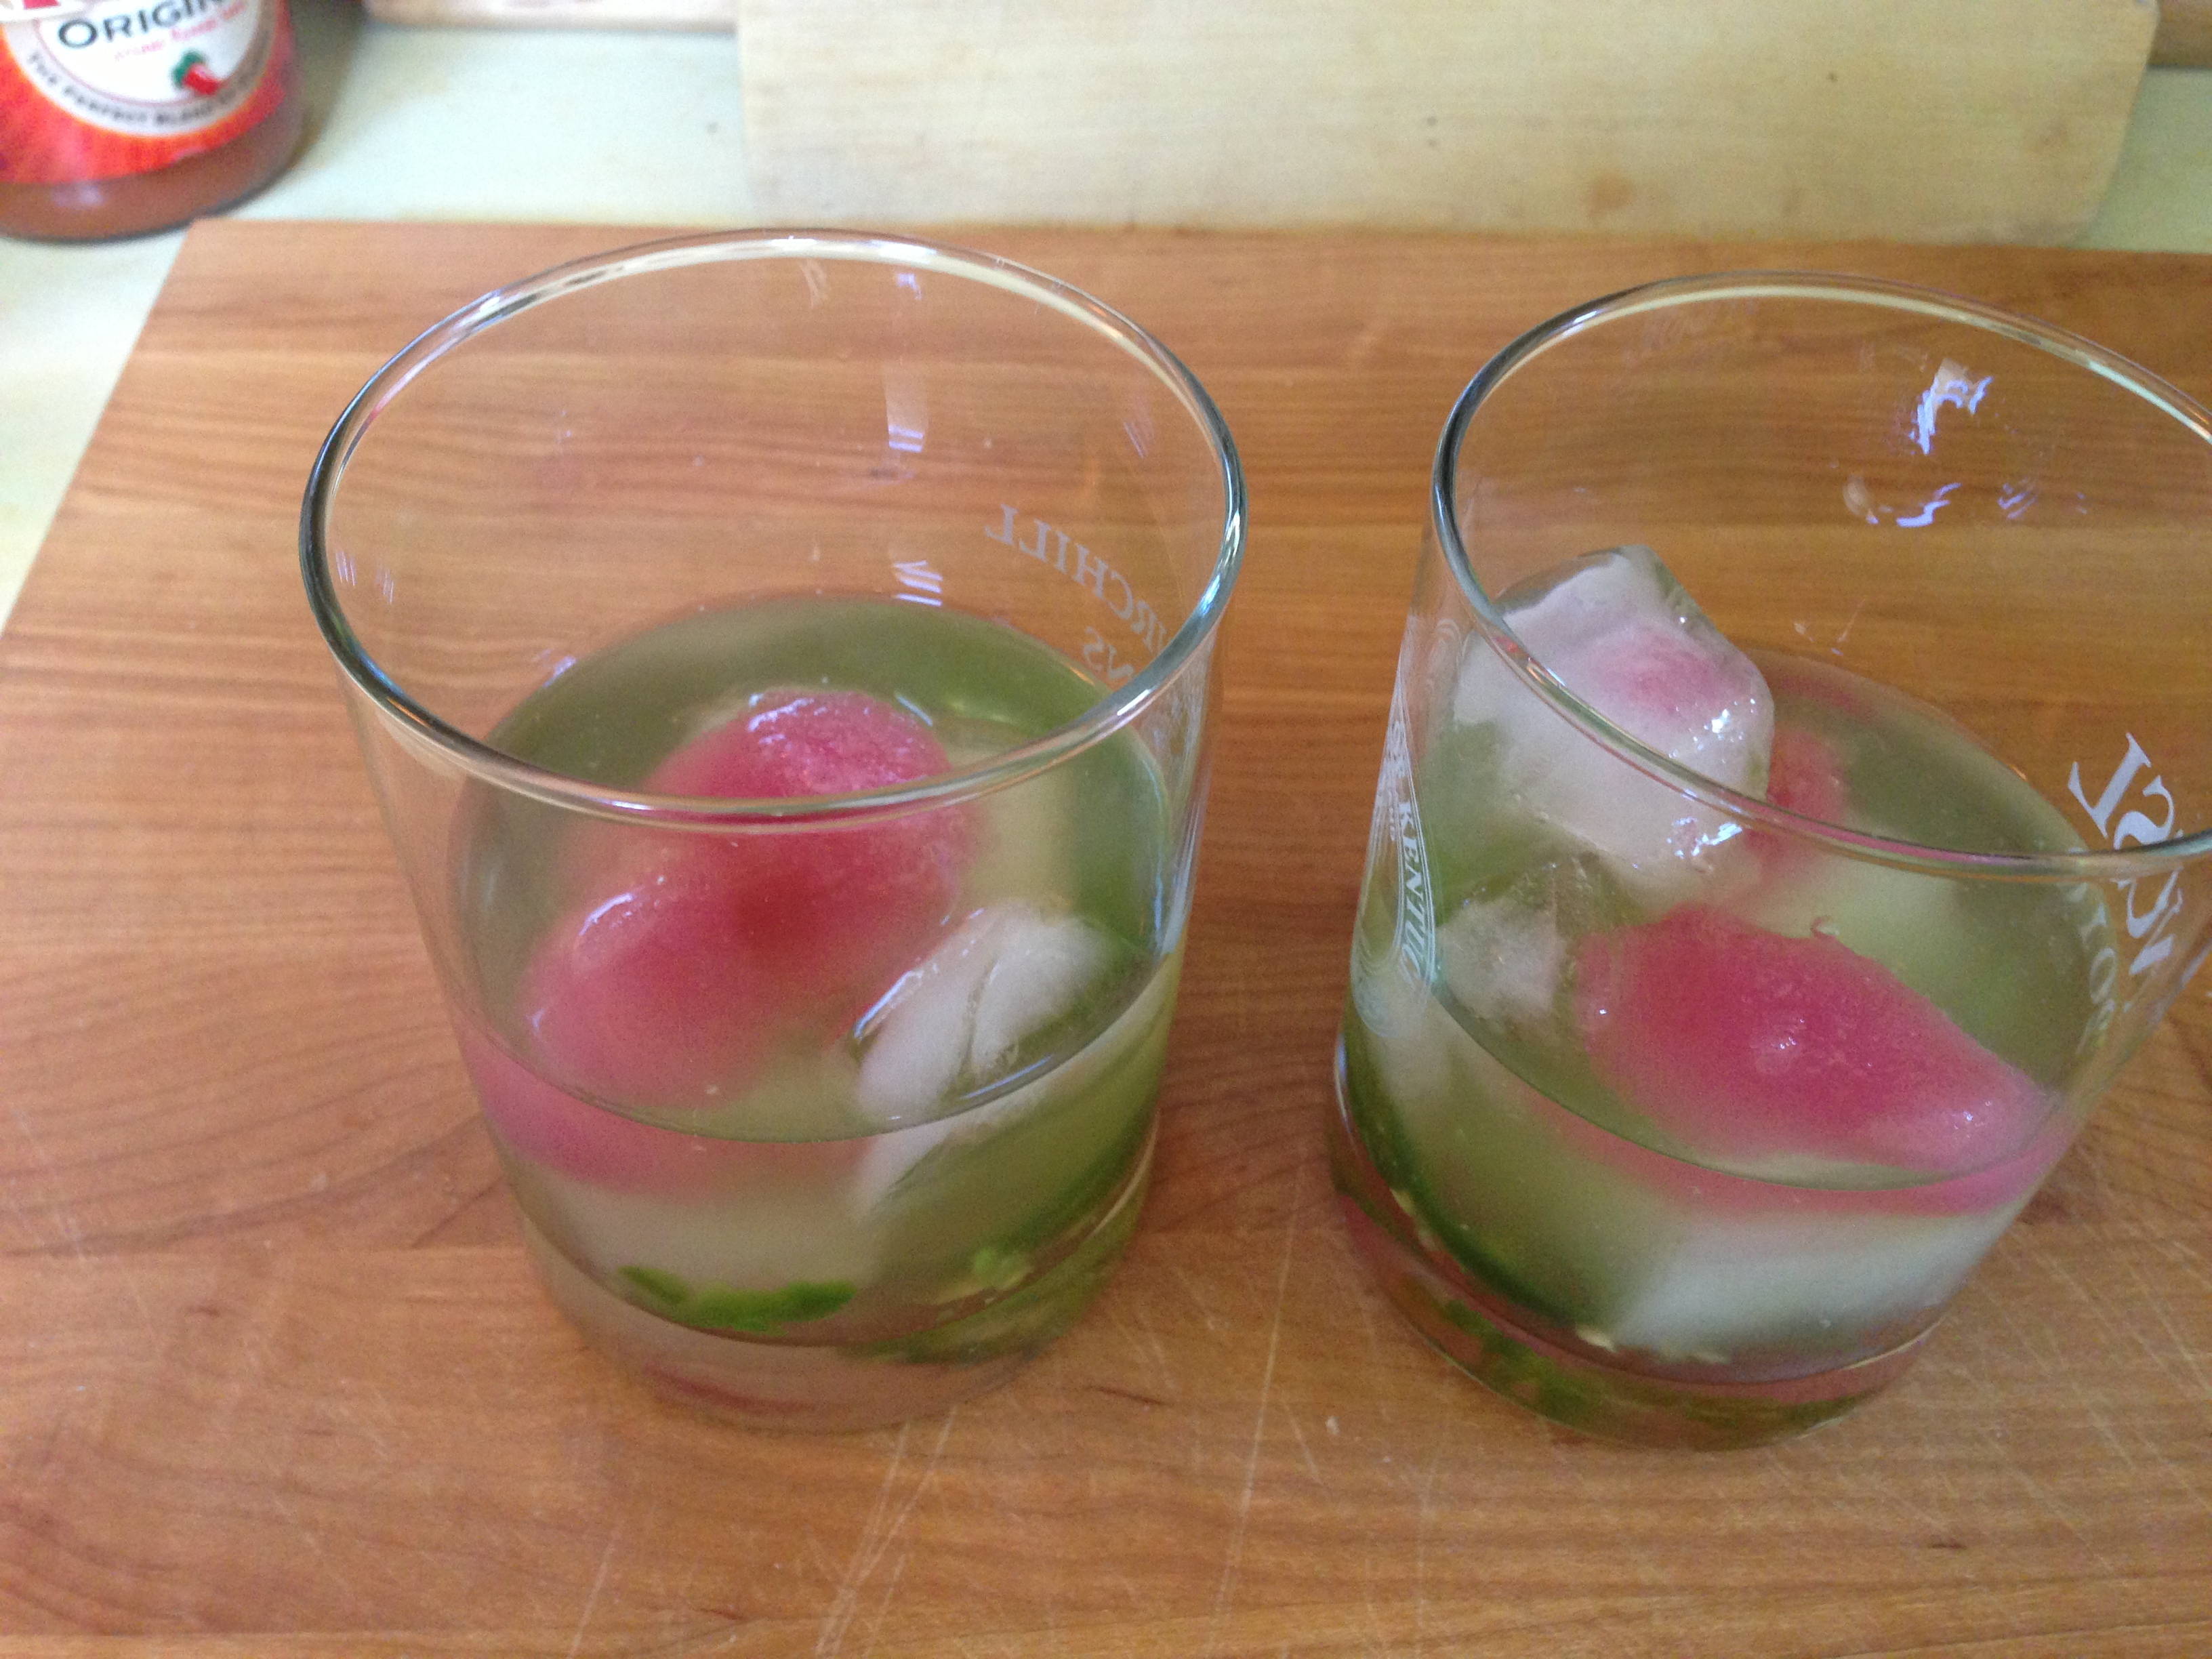
After the 20 minutes are up, turn heat down on the blueberry mixture and strain the jalapeño mixture into the blueberry.

IMG_9562

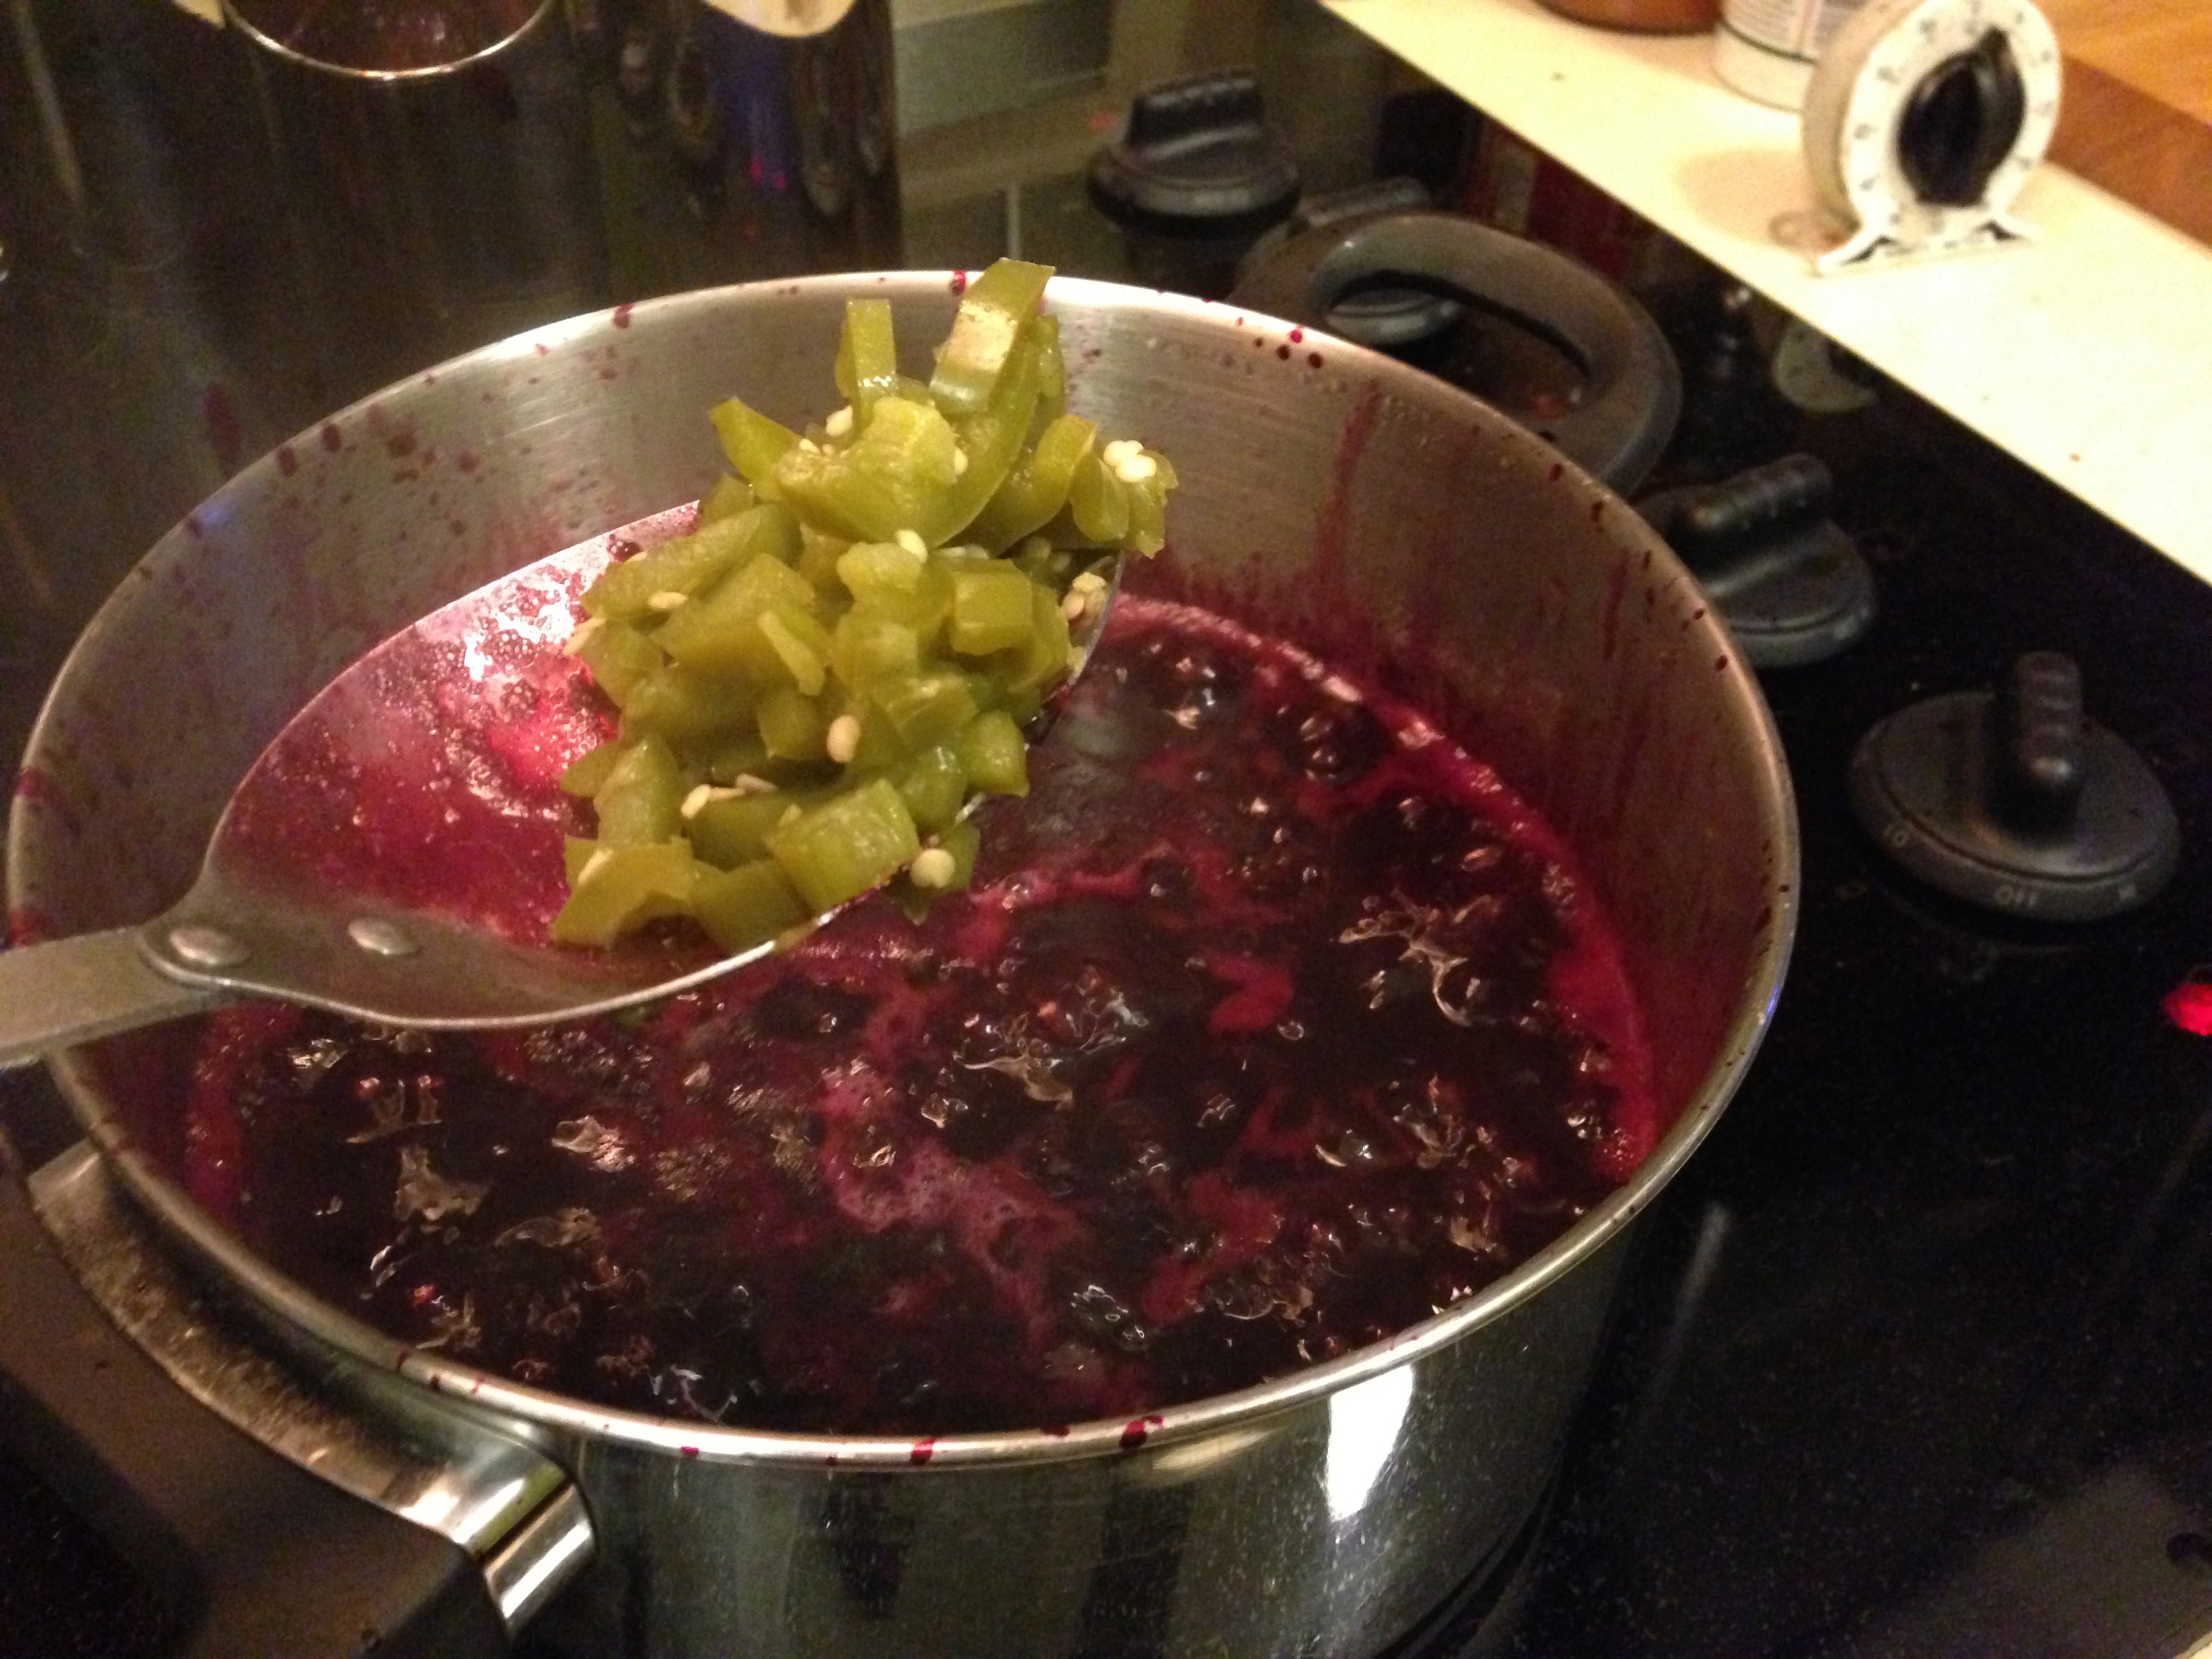
Take about 1/2-3/4 cup of jalapeño and add to blueberry mixture.

IMG_9564

Add sugar and cook on lower heat until mixture sugar is dissolved.  Add pectin and bring to a rolling boil for at least 1 minute.

IMG_9565

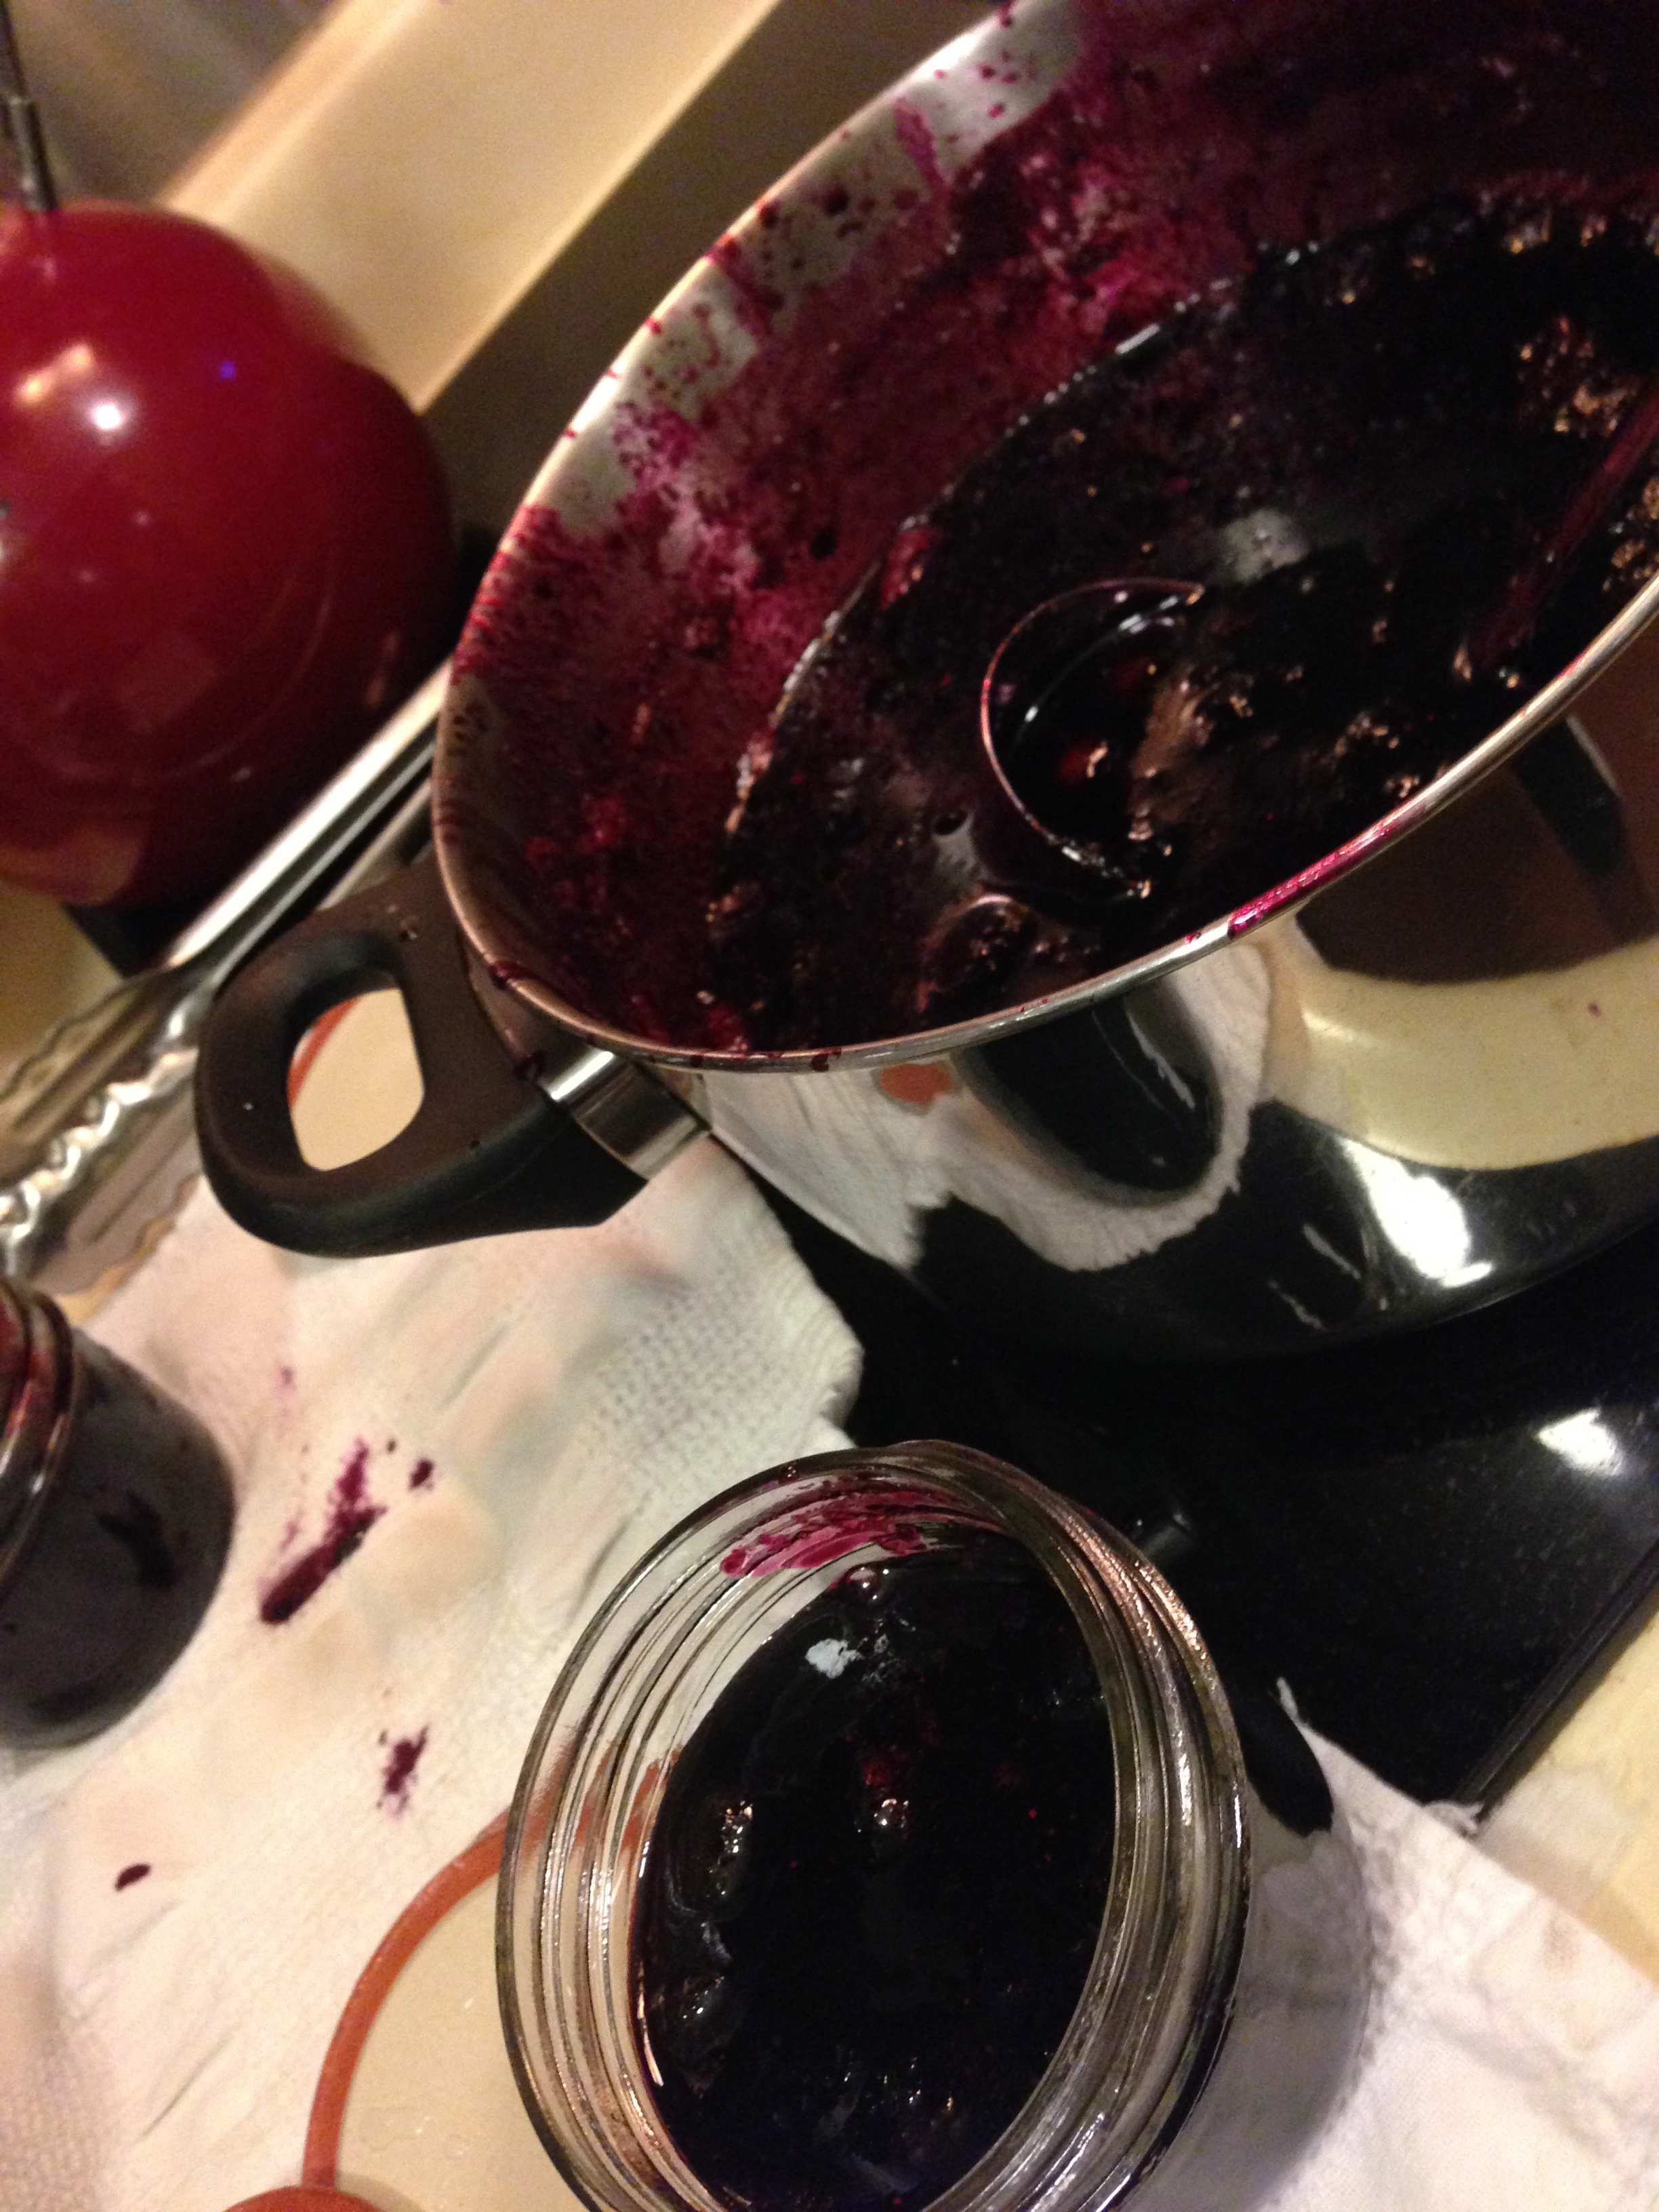
Remove from heat and spoon mixture into jars (I used 1/2 pint wide mouth).

IMG_9567

Place jars in hot water bath for 5 minutes.

IMG_9568

Jars will take anywhere from 20 minutes to 2 hours to “pop” and seal.  If they do not, refrigerate or freeze those jars immediately.  I’m listening to the music of jars popping as I write this post.  Sweet success.

IMG_9569

There was a little left over that did not warrant canning so I put it on some vanilla ice cream.  That will be happening again.  Soon.

IMG_9570

Blueberry Jalapeño Jam

5 cups blueberries

1 cup jalapeños, chopped

1 1/2 cup water

1/2 cup vinegar

1/2 cup lemon juice (divided into (2) 1/4 cup)

5 cups sugar

1 4oz package pectin

Place jars and lids (not bands) in boiling hot water (you will also use this for your water bath after filling the jars).

In saucepan bring jalapeños, 1/4 cup lemon juice, 1 cup water and 1/2 cup vinegar to a boil for 20 minutes on medium high heat.

Simultaneously, bring blueberries, 1/4 cup lemon juice and 1/2 cup water to a boil for 20 minutes on medium high heat (use a larger pot because you will be making the jam mixture in this).

Once mixtures are finished, bring heat to low on blueberry mixture and strain jalapeño juice into blueberry.  Spoon about 1/2-3/4 cup of cooked jalapeños into blueberry mixture.  Add sugar and leave on low heat until sugar is dissolved.  Add pectin to blueberries and bring to a rolling boil for a least one minute.

Remove blueberry mixture from heat and ladle into jars, tighten lids and place in boiling water bath for 5 minutes.  Lids should “pop” and seal anywhere from 20 minutes – 2 hours after coming out of the water bath.  Enjoy in plain yogurt, over ice cream or on Ritz crackers with cream cheese!

Who Doesn’t Like a Little Spice?

I’ve had a few spicy cocktails this summer and have been wanting to experiment with my own so I don’t have to go out to dinner just to have one.  We have a wonderful bounty of jalapeños this year in our garden so I decided to experiment with my own Jalapeño Margaritas.  This recipe is a perfect blend of sweet, salt and spice.  If you like jalapeños you will not be disappointed.

Slice the jalapeño and divide between two glasses.  If you want salt, make sure that you salt the glasses first.
ImageImage
 Pour a small amount of tequila in both glasses and muddle.
IMG_9125 IMG_9126
Once jalapeño is fairly well crushed, add ice and desired amount of tequila
IMG_9127
Add two teaspoons Minute Maid frozen concentrate (or whatever brand you prefer) to each glass and then top with sparkling water.  This time I did not have the limeade on hand but had some pink lemonade so I used that instead (it was surprisingly tasty!)
IMG_9128 IMG_9129
Stir and enjoy!!!
IMG_9130 IMG_9131

Jalapeño Margaritas

Serves 2
1 Jalapeño
Tequila to taste
8 ice cubes
4 tsp minute maid concentrate, divided (Limeade preferably)
Sparkling water
Margarita salt for rim (optional of course)
2 straws (highly recommended if you’re having more than one – your lips may burn off even tho the drink isn’t that spicy)
Salt rims of glasses.  Slice jalapeño and divide between both glasses with a small amount of tequila and muddle.  Add ice and desired amount of tequila.  Two teaspons of frozen juice concentrate per glass and top with sparkling water.  Stir and serve.  I hope you enjoy them as much as I do!  Cheers!!

No Pectin Apricot Jam

One of my favorite memories of my mom is in the kitchen making her amazing jams.  She made all kinds; blackberry, raspberry, strawberry, marmalade, apricot…  Apricot was always my favorite.  We would have it on Swedish pancakes, toast or anything else we could justify putting it on.  I was feeling a bit nostalgic at the grocery store one evening after work and decided I would try my hand at apricot jam.  I picked up about three pounds of apricots figuring that a little extra would be good.  Two pounds/six cups chopped apricots are what the recipe I had been eyeballing called for so I figured we’d be able to eat whatever was left.

Since I had never really canned fruit before, I did quite a bit of research.  One of the worst things that had happened to me when making my garlic and pepper jelly was that no matter how hard I tried it would boil over when cooking the mixture.  It was actually a very frustrating experience, feeling like whatever I did I couldn’t get it to not boil over.  I read on a few posts that if you put a pat of butter into the fruit while it was cooking that it would prevent it from boiling over.  Seriously skeptical but desperate to not have my fruit boil over and burn all over my stove top I frantically tossed about a tablespoon of butter in when it started to foam up, and almost immediately the foam disappeared!  I couldn’t believe it.

I was also concerned about not using pectin, but thought I would give it a whirl – if it didn’t work out, I would have apricot “syrup” instead.  But, I’m happy to report that it worked!  I can’t wait to try blackberry jam next.  Although, since this recipe only yields about 5-6 8oz jars, I think I might do one more batch.

Start off by chopping 6 cups of Apricots – about 2lbs

Zest one lemon and add lemon zest, juiced lemon and sugar to apricots and stir

Cover and let sit at minimum 1 hour – preferably 8 hours or overnight if you have the time (I did mine early in the morning and let it sit for about 10 hours and then canned that evening)

Place apricot mixture in non-reactive pot (no cast iron) and bring to a boil for about 10 minutes – this is where my pat of butter came in handy!

While your apricot mixture is boiling away (and not over boiling!), sterilize your jars in a hot water bath if you haven’t already

Place your jam into jars, securing lid firmly by hand, and place in water bath for at least 10 minutes

Set out on counter to cool and let the tops pop and seal (my favorite sound!)

No Pectin Apricot Jam

2lbs/6 cups ripe and slightly firm apricots, chopped

1 lemon zested and juiced

4 cups sugar

5-6 8oz canning jars

Combine apricots, lemon zest, lemon juice and sugar in bowl.  Stir until completely combined cover and set aside for at least an hour – recommended 8 hours or overnight so you get the maximum amount of juices.

Uncover apricots and stir, making sure no sugar has sunk to the bottom.  Place mixture in non-reactive pot and bring to a boil, then reduce to a simmer for 10 minutes.  Then bring to a boil for at least 5-15 minutes until desired thickness is achieved.  This is when you may need to place your butter in the mixture to keep it from boiling over.

Ladle apricots into 8oz or other desired jar size within 1/2 – 1/4 inch from the top, wipe rings of any dripped fluids and tighten with hands.

Place jars in boiling water bath for 10-15 minutes, remove and let cool.  Store in a cool place and enjoy!

I never knew there was such a thing as pudding cake….

But there is!  And its glorious.  My husband found this recipe online for strawberries and rhubarb, but my dad brought over a ton of peaches and I didn’t feel like making a cobbler, so I modified the Pudding Cake recipe for the peaches (and a few super duper ripe nectarines).  It was probably one of my best (and easiest!) baking accomplishments.  Ever.  The moist cake soaks up all the yummy goodness of the cooked peaches and nectarines.  It’s a pretty low sugar recipe – especially if you have sweet fruit.  This is a recipe that is great for week nights or anytime – its something that you will love and your guests (if you care to share) will be impressed!  I’m making this again this week, but with different fruit – I haven’t decided what yet.

Prepping is super easy, just cut and peel the peaches.  My nectarines (I only had two) were so soft, I couldn’t peel them, but it didn’t seem to matter.

While you’re attending to your fruit, melt the butter and set aside – I don’t have a microwave, so I do it on the stove.  You’ll want the butter melted, but not hot when you mix it into your wet ingredients

Once your fruit is cut and ready to go, place on stove with lemon juice, water, corn starch and a smidge of sugar

While your fruit mixture is simmering away, mix your dry ingredients into a small bowl

Then mix your wet ingredients together, all the while, checking your awesome fruit

Whisk dry and wet ingredients together it will have the consistency of thick pancake batter

Reserve 3/4 cup of cooked fruit mixture and liquid (I only did 1/2 cup and felt it wasn’t enough).  Pour the rest into a greased 9×9 baking dish

Cover evenly with cake batter

Then pour reserved fruit mixture over top

Place in the oven for 25-30 minutes (my oven runs low, so I had to bake it for 30).  Set on rack for 5 minutes and serve warm – but its great a room temperature too!

Peach and Lemon Pudding Cake

1/4 cup water

1 1/2 tsp cornstarch

1/4 cup plus 1/2 cup, sugar

3-4 cups peaches or fruit of your choice, cut and peeled as you prefer

1 large lemon, juiced

1 cup all-purpose flour

1 3/4 tsp baking powder

1/2 tsp salt

1 large egg

1/2 cup milk (original recipe called for whole, I used 2% and it tasted the same!)

1/2 cup (1 stick), unsalted butter

1 tsp vanilla extract

Place baking rack in middle of oven and preheat to 400 degrees.  Butter a 9×9 glass or ceramic baking dish and set aside.

Melt butter while preparing fruit.  Place fruit, water, 1/4 cup sugar (more or less depending on sweetness of fruit), lemon juice and corn starch in saucepan and cook until simmering, stirring constantly.  Simmer for 3-4 more minutes and set aside.

In small bowl, whisk flour, 1/2 cup sugar, baking powder and salt.

Whisk together butter, milk, egg and vanilla in a large bowl.  Slowly incorporate the flour mixture until blended completely.

Reserve 3/4 cup fruit mixture and liquid and set aside.  Pour remaining fruit mixture into prepared baking dish and cover evenly with cake mixture.  Sprinkle reserved fruit mixture on top and place in oven for 25-30 minutes.

When toothpick inserted in middle comes out with no batter, you’re done!  Place on baking rack for 5 minutes and serve warm.  Enjoy!

Strawberry Lemon Muffins

Strawberries!  Its that time of year, and we have been getting strawberries in our veggie box every week.  I stumbled upon a recipe for strawberry lemon muffins and thought it would be a nice to switch it up for once.  Especially since I had basically eaten all the other strawberries that had come in the previous box and not shared them at all.  Oops.  Since recipe I found had a few ingredients that I didn’t have in the cupboard there was a little substituting involved.  However, no one was poisoned and I’ve actually already eaten four so I think its a recipe I’ll make again.

Starting off with mixing my wet ingredients:

Then mixing my dry ingredients and adding the strawberries in:

Add the wet ingredients in:

Fill the muffin cups about 3/4 full – this recipe fills them perfectly.

Put in the oven for 25 minutes at 375 and voila!

Strawberry and Lemon Muffins:

1/4 cup vegetable oil

1/2 cup milk

1 egg

1 lemon, zested and juiced

1 3/4 cups all-purpose flour

1/2 tsp salt

1 tsp baking powder

1/2 cup sugar

1/4 cup brown sugar, packed

1 cup fresh strawberries

Preheat oven to 375 and line a muffin tin with liners.  In a bowl whisk oil, milk, lemon juice and egg.  Seperately, mix flour, sugar, brown sugar, baking powder and lemon zest.  Mix in strawberries to flour mixture and then add mixed wet ingredients.  Fill muffin cups 3/4 full with batter and put in the oven for 25 minutes or until toothpick inserted comes out clean.  My oven runs a little on the low side and I baked them for exactly 25 minutes, so it may be less for some with a better oven.  A great weekend morning treat!

Veggie Box Soup

We recently started getting a vegetable box to supplement our growing garden and enjoying our weekly abundance from Farm Fresh to You, a local organic produce delivery service – http://www.farmfreshtoyou.com/index.php.  In our box, we are graced with a newsletter that has a few recipes that includes ingredients that have been in our box for that week.  I choose to test out the Tomato & Onion Soup.  While I wish I could claim this recipe as my own, I certainly have to give credit where credit is due.  Of course soup is my favorite weeknight dinner, it includes everything you need in one bowl and is perfectly satisfying.  This recipe is so incredibly simple, I was skeptical.  But I must say, that I was pleasantly surprised; roasted veggies, and water?

Set all your vegetables on a cooking sheet and drizzle with olive oil, salt & pepper.


After vegetables have roasted in the oven for about 55 minutes at 400 degrees, puree half of the veggies, half of the chopped basil and all of the garlic in a blender (or use a hand blender in a saucepan) with 1 cup water.

 After vegetables, garlic, water and basil are blended, mix the rest of the whole vegetables, basil, water, 1 cup 2% milk, salt and pepper to taste.  Let simmer for a few minutes until clearly heated.

Once heated through, serve immediately.

Tomato and Onion Soup

6 large tomatoes, quartered

1lb carrots, chopped (no need to peel)

1 red onion, thinly sliced (not paper-thin, but thin enough – original recipe called for onion, I chose a red onion for the flavor)

4 cloves garlic, peeled

1/2 cup basil, chopped

2 cups water

1 cup 2% milk (non fat is called for in the original recipe, but I really preferred the 2%)

Olive oil

Salt & Pepper to taste

Preheat oven to 400 degrees.  Place all vegetables on baking sheet and lightly drizzle with olive oil, salt and pepper.  Toss lightly and place in oven.  Cook for 55 minutes, stirring occasionally.  Do not worry about stirring too much, the veggies need to get very brown and over caramelized – this brings out more roasted flavor in the soup itself.  Pull vegetables out of the oven and divide in half.  Place half of the vegetables and all of the garlic cloves in a blender (or place in a saucepan and use a hand blender), with 1 cup water and 1/2 of the basil and blend.  Place rest of vegetables, water, milk and basil in saucepan with blended vegetables and bring to a simmer over medium high heat.  Season with salt and pepper to taste and serve.  

Enjoy!  We certainly did!

Notes: My husband commented to me that the soup tasted even better the next day when he reheated it for lunch, so if you feel like waiting on it let the soup sit in the fridge for a day and reheat.

Pizza on the Grill

For most of 2010 (well, all of 2010), we had a faulty oven, that my husband was promising to fix.  After getting tired of skillet meals and the normal run of the mill BBQ, we decided to try our hand at grilled pizzas.  Why not?  We had the grill, the vegetables, the ambition; nothing was holding us back.  I have not yet attempted to make my own pizza dough, but I will try at some point when the inspiration hits me over the head.  However, now my oven is working again, so I’m no longer relegated to the grill and creative skillet cooking.

I started with a simple pizza sauce, with sweet Roma tomatoes, a splash of olive oil, basil and garlic. 

Cook over medium to medium high heat and alternating stirring and using the potato masher until you reach the optimum consistency for your pizza sauce.

For vegetarian pizza slice fresh mozzarella, artichoke hearts and fresh basil.

For this pizza we used a local bakery, pre-made whole wheat crust.  The whole wheat crust had a sweet quality to it.  Lightly coat with olive oil.

Spread sauce on pizza crust.

Place sweet heirloom tomato on pizza.

Add on fresh mozzarella.

Place on artichoke hearts.

Lastly, the basil – this will let the basil crisp so slightly when grilled.

Place on the grill quickly.  Try not to open the grill top or keep open for too long, you want the gill to act like an oven, not only cooking it from the bottom, but melt the cheese on top as well.  Don’t let the bottom of the grill get too hot, otherwise the bottom of the pizza will burn.

Yummy!  A great finished project.  We did well for our first go around.

Pizza on the Grill

Pizza Sauce

5 Roma tomatoes, chopped

1/2 yellow onion, chopped

1/4 cup chopped basil

1 clove garlic, chopped

1 tbl olive oil

Pizza

1 premade organic whole wheat crust (or more if you so desire)

1 large ball fresh mozzarella

1 large sweet heirloom tomato

6 marinated artichoke hearts, quartered

1/4 cup fresh basil

olive oil

Sauce

In a medium saucepan, heat olive oil, garlic and yellow onion over medium-medium low heat.  When onion is almost translucent, toss in tomatoes and basil.  Cook thoroughly and add salt if desired.  Set aside.

Pizza

Preheat grill to a medium heat, making sure not to open the grill top too much, you want the heat to be even and not just on the bottom of the pizza.

Place dough on baking sheet and brush lightly with olive oil.  Cover in sauce.  Top with fresh mozzarella, artichoke hearts and chopped basil.

Bring pizza out to the grill and quickly slide in, keeping the grill on a lower heat.  Check after 8-10 minutes and cook a little longer if necessary.

Enjoy!

Everything but the kitchen sink

Cold short winter days.  Minimal time.  Hunger.  That sums up my weeknights November through February pretty well.  These are the times when I revert back to my comforting soups and stews,  tossing everything from the refrigerator into a big pot, adding a few dashes of spices and hope it turns out well.  One dish I have mastered.  Or, I would like to say I’ve mastered is black beans.  A nice hearty stew-like dish that can be served over a bed of mixed greens (my preference), rice, quinoa or just by itself.

I normally just saute onions and bell peppers, but in this instance we had left over corn on the cob.  So into the pot went the corn cut from the cob and a whole yellow onion.  The vegetables should be sautéed until they are all cooked through and the onion is translucent.

Toss in oregano, salt & pepper and stir while veggies are still cooking.

Then the spices.  I like to use whatever is handy in the spice rack, but the staples are chili powder, cumin and ginger powder.

Most importantly, once the veggies are thoroughly cooked, in go four cans of organic black beans.  I do my best to find beans that have only black beans and water.  No added salt, sodium, ect.  Trader Joe’s makes a great Organic Black Bean.

Using a potato masher, give the beans a good mashing – this is an excellent source for stress build up from the day.  Alternate mashing with stirring and bring the beans to a boil.  Reduce to a simmer for at minimum of half an hour.  But with this dish, the longer the better on a low heat – be sure to stir every few minutes so that the beans don’t burn.

Once beans are cooked, serve in desired vessel with your favorite cheese and other toppings.  My favorite is pepperjack cheese and avocado.  Enjoy!

Vegetarian Black Beans

4 cans organic black beans

1 large yellow or mild white onion

assorted desired vegetables

Salt & pepper to taste

2 Tbl olive oil

2 Tbl Chili powder

1 Tbl Oregano

two light shakes, cumin

two light shakes, ginger powder

other spices to taste

In medium sized pot over medium-high heat, saute onion and chopped vegetables stir vegetables so they are evenly coated with olive oil.  Once vegetables start to sizzle toss in salt & pepper (do not over salt – you can always add it later – this is just to give the veggies some flavor), chili powder, oregano, cumin, ground ginger and any other desired spices.  Stir until evenly coated continuing until all vegetables are cooked through and the onion is translucent.  Add in black beans – liquid and all.  Stir throughly so that veggies are properly mixed in and bring to a boil.  Use your masher every 5 minutes or so and stir each mashing.  Once beans come to a light boil, reduce to a simmer stirring often so they do not stick to the bottom of the pot and burn.  Cook for a minimum of half an hour.  Serve with your favorite toppings and enjoy!

Brown Butter, Sage & Feta Egg Noodles with Arugula & a Poached Egg

There was a vision. A birthday dinner.  For my husband.  On a weeknight.  I needed something quick, but special.  Not something that we would have everyday.  Egg Noodles are my husband’s absolute favorite and they cook in under eight minutes too!  Nothing compliments egg noodles better in my book than browned butter and sage.  Toss in a little feta and voila!  Dinner in 15 minutes!

Toss chopped sage into pan with butter turn on low heat about one minute before dropping noodles in to cook.  The butter should be cooked on low to medium low heat for 6-7 minutes until it starts to brown.

About 6oz of feta cheese.  You don’t want your cheese too strong, otherwise it will compete with the earthy flavor of the sage.

While noodles and sage butter are cooking,  bring saucepan of water to boil for poached eggs.  Toss arugula with a sprinkling of champagne vinegar, olive oil, salt & pepper.  Place on plates and set aside.

Place 1/3 noodles in bowl, with 1/3 feta on top and repeat until all in bowl.  Pour browned butter on top and toss.

Place noodles in serving dish and set aside.

Once water is at rolling boil, bring down to low heat.  Toss in a pinch of salt and white vinegar.  Stir water with slotted spoon and place egg in middle of the vortex you have just created.  The circular motion of the water will keep the egg intact.  Keep water hot, but don’t aggressively boil otherwise it will break up the egg.  The egg should cook for about 2 minutes.  Remove with slotted spoon so that all the water can drain off before placing it on the salad.

I must note here, that I was completely b.l.o.w.n. away by my ability to properly poach an egg.  I was a free poach egg virgin up until this point.  Now, I’m an egg making machine…  No, not really – I just liked the sound of that.

Brown Butter Sage & Feta Egg Noodles with Arugula & a Poached Egg

1 package egg noodles

1 stick unsalted butter

6oz feta cheese

1 good sized handful of sage, chopped

Arugula – enough for however many you’re feeding

poached eggs – 1 for each salad

olive oil

champagne vinegar

salt & pepper

Wash & drain arugula – set aside.

Bring water for noodles to boil.  In as seperate small saucepan, place stick of butter and sage on medium/low heat.  After butter/sage has been on heat for about a minute.  Toss in egg noodles.  Continue to cook butter mixture on medium/low heat stirring occasionally until it begins to brown (noodles should be cooked at approximate time butter is finished).

While butter & noodles are cooking.  In a seperate saucpan bring water for eggs to a rolling boil.  Once water is boiled splash a bit of vinegar (the vinegar will help keep the egg together), bring down to a minimal boil with few disruptions in the water*.  With a slotted spoon, create a vortex in the water and break egg into the middle.  The water’s direction and the vinegar will help keep the egg in one place.  If egg is room temperature it should cook about 2 minutes.

While eggs are cooking toss arugula with olive oil, champagne vinegar, salt & pepper to taste and place on salad plates.  When eggs are done, place individually on each plate.

Noodles & Butter should be done, drain noodles and place 1/3 of noodles in serving dish, then top with 1/3 feta cheese, repeat until all of noodles & cheese are in the bowl.  Then top with browned butter & sage mixture, toss and serve.

*  Make sure the water stays at a simmer.

Salmon Burgers with Fennel & Zucchini Slaw

We were given a massive Zucchini a little while back and I’ve been slowly cooking it over the past week and a half.  Yes, it’s that big.  While looking for recipes I came across this combination and it piqued my interested.  My most creative salmon dishes are normally poaching and grilling, so the opportunity to make something more daring was going to be a fun challenge.  I found this recipe on epicurious.com, but I did play with it a little bit a few times to change the flavor a little more acidic.  I prefer the citrus bite, but if you’re interested in the orignal recipe, please check it out on the website – I’ve listed my recipe here. 

The prep really is the longest of  everything.  But all in all, including cook time, it shouldn’t take you more than 40 minutes.  I’ve actually made the slaw separate for a few bbq without the salmon cake mixture – super easy, just half the mayo mixture (and add a smidge more lemon juice).

Perfect for a summer evening and really a fun, quick and easy weekday recipe.

Grate zucchini and fennel with a cheese grater.  If you have a mandolin, that would be better to grate the fennel, but I don’t so I use the slicer on the cheese grater.  It works. 

Coarsely chopped chives.  I’ve made the recipe without, and it’s just not the same.  If you don’t have chives, green onions will work.  But there’s something about the slight garlic taste in the chives that really makes the recipe.

Take the skin off the salmon and make sure there are no bones in it.  If you can, get the fish counter to remove the skin for you.  Fortunately for me, since the salmon needs to be chopped, it doesn’t matter how much I butcher the fish when attempting to remove the skin.  Oopsie.

I am perfectly capable of roughly chopping the salmon.  Thank goodness.


The mayonnaise and mustard mixture the same for both the fennel slaw and the salmon cakes.  The difference is that the salmon cakes have the cayenne pepper and ritz crackers and the slaw has just a few pinches of salt.

Mix crumbled Ritz crackers, half of mayonnaise mixture and half of the shredded zucchini together. 

Once the salmon is all mixed in, they’re ready to cook.  I like to start my first batch of cakes in the frying pan and then just mix the fennel and remainder of the mayonnaise mixture.

Once the mayonnaise mixture, fennel and remainder of zucchini add salt and additional lemon juice to taste.

Heat a little olive oil in the pan and make cake patties. Don’t make them too big (no larger than 2-2 1/2 inches in diameter) because when you go to flip them they will fall apart.  Cook on medium high heat 2-3 minutes on each side.

YUM.

Salmon Cakes with Fennel & Zucchini Slaw

2 fennel bulbs, trimmed and thinly sliced

2 medium Zucchini shredded

1 1/4 lb. Salmon, coarsely chopped

6 Tbl Mayonnaise

4-5 tsp bold, grainy Mustard (I really like the Mendocino brand because its got a bold mustard flavor)

1 bunch Chives, coarsely chopped

8 Ritz crackers, crushed

1 1/2 Lemons, juiced

dash of cayenne pepper

salt to taste

olive oil for frying

Mix mayonnaise, mustard, chives and lemon juice together in medium bowl.  In separate bowl, mix Salmon, half of shredded zucchini Ritz crackers, dash of cayenne and half of mayonnaise mixture in medium bowl.  Heat oil in pan and form salmon mixture into small cakes.  Place in medium hot pan and cook 5-6 minutes only turning once – this is important, I’ve learned.  If you turn them too much, they will start to fall apart.  While cakes are cooking, mix remainder of zucchini, mayonnaise and fennel together.  Once mixed, add salt and lemon juice to taste.

Serve and enjoy!